|
|
Post by prototyp on Jan 17, 2010 18:59:47 GMT
Hiya! Coming off a several-year hiatus with some momentum. Inspired in particular by Cornell's work, I'm finally resolve to move to a CAD (Metasequoia for now) and Pepakura development process... Bit of a learning curve, though I found some tutorials for model planes that helped me get my head around the concepts involved in creating a cad model from scratch. Still have to generate scale four-view drawings to trace over in Meta. It's frustrating that there's no way to use that vector data directly as a basis to extrude forms, CAD work would be that much faster and more precise. There's also some wackyness concerning scale going from a screenshot in Illustrator to those images placed in Meta to Meta's arbitrary "units" based grid, then to Pepa (which took me a while to find out scales art to fit pages by default)... hopefully the outcome will more or less be 1/24, but I'm not quite confident that I can splice new CAD work onto current hand-projected projects. All that said, progress is good, I think. First project to tackle is the fairly-simply-formed BMW LMR which won Le Mans in 1999. First-round CAD roughing is looking good, I'm scaling the steep part of the learning curve quickly. Lots of focus on trying to get the most form out of the least number of slices and maintaining shapes which can easily be replicated in paper. Next to work on are the underlying structures. It has yet to be seen how much post-Pepa work I will have to do with regards to more complex tabs and slots and and articulating panel devisions and such... 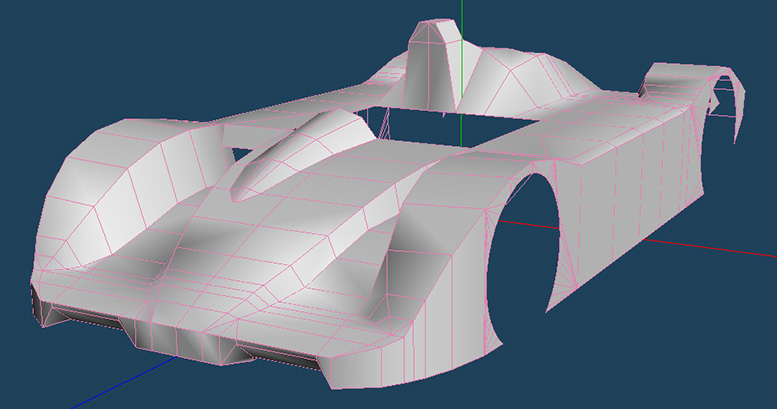 Lastly, instead of spending time revamping the Prototyp website (itself 10 year old technology), I've started a Facebook page to track incremental progress updates. Hope to see you there!Happy new year, and happy 10th anniversary to the Prototyp project! |
|
|
|
Post by prototyp on Jan 18, 2010 6:03:04 GMT
Incremental work: diffuser ducts, engine hump, fender smoothing... 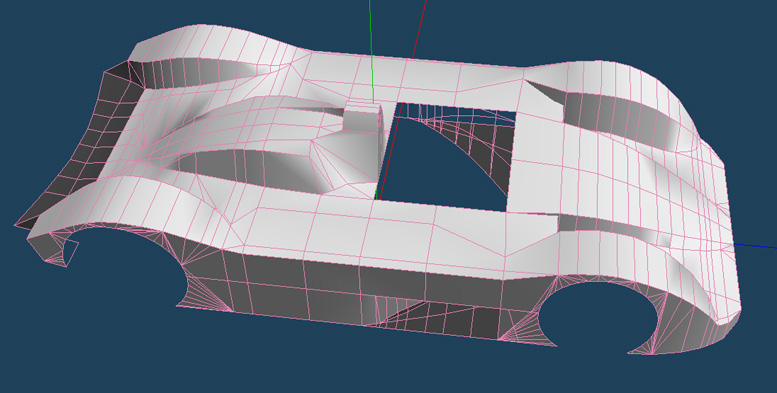 |
|
|
|
Post by cornell on Jan 18, 2010 13:42:39 GMT
Woohooo, this is great news!!! Keep on good work...  |
|
|
|
Post by Robert Arosteguy on Jan 18, 2010 16:30:18 GMT
Incremental work: diffuser ducts, engine hump, fender smoothing... Ryan your model looks perfect! Not too much, not to little polygons. Just perfect! |
|
|
|
Post by prototyp on Jan 19, 2010 23:03:54 GMT
Woohooo, this is great news!!! Keep on good work... Thanks, man... It's funny, as I was going through various Metasequoia resources - reading documentation, doing little tutorials - I had started a big list of questions to ask you, all stuff that you would have had to work out in order to create the models you've done. But, as I would write these questions and think them through, I would start to understand what the solution was, so I'd just go back to work. Thanks for your help!  |
|
|
|
Post by igoraf on Jan 20, 2010 17:57:50 GMT
Woohooo, this is great news!!! Keep on good work... Thanks, man... It's funny, as I was going through various Metasequoia resources - reading documentation, doing little tutorials - I had started a big list of questions to ask you, all stuff that you would have had to work out in order to create the models you've done. But, as I would write these questions and think them through, I would start to understand what the solution was, so I'd just go back to work. Thanks for your help! Hi Ryan, excellent work you did!! I think you could post here some of your questions. So other people could also learn from the answers. Although I am not a heavy user as Cornell, I have worked with Metasequoia a long time and might also help in something. Continue your excellent work, success in your projects and sorry my 'Googlenglish'. |
|
|
|
Post by prototyp on Jan 25, 2010 2:22:38 GMT
Another sorta-weekly update (posting these up on Facebook as well). Lots of massaging forms, in particular the roll-hoop and its interaction with the engine hump. Roughed-in "wheels" are just blanks for now to help with scale. Trying out Meta's primitive rendering engine, too...  Still a bit more to do on the shell, and a bunch of work under the skin as well as driver-area details (ya, 1/24 interior!). |
|
|
|
Post by prototyp on Jan 25, 2010 2:24:32 GMT
Oh, and thanks for the kindness Igoraf... Nice to have experts as a resource. I will send some questions your way.
|
|
|
|
Post by prototyp on Feb 1, 2010 1:54:27 GMT
Keeping up with the weekly progress updates. Had hoped to get some paper test parts printed by this weekend (four weeks since I started this project) but that'll have to wait till maybe next week. Bodyshell got another round of subtle tuning. I've been pretty successful with matching Meta rendering perspective with actual photos of the car... revealed some things I was able to correct (front fenders too bulky in side-view). Some proportions and details are dead-on. Looking forward to first bodyshell test prints soon. Most work this week has been on the inner armature structure, particularly the complex catelevered wing supports on this carr. I'm also flirting with doing the wheel design work in Meta instead of Illustrator. My relationship with Metasequoia itself is coming along. Customized many of the key commands so the concepts are similar to those I use throughout my 2d design tools. I also discovered how to 'nest' groups of objects in Metasequoia, so now have answered all the questions about using the app which I had originally. New problem: so far I haven't found a "step and repeat" tool to create duplicates of the wheel spokes radially around a common centerpoint. Need to look for a nicer renderer...  |
|
|
|
Post by Ponytail on Feb 2, 2010 10:39:55 GMT
Hello Ryan, I'm glad to see you're 'back in business'. Where have you been?  Promised: I will follow your progression every week, or so... Greetings PT |
|
|
|
Post by prototyp on Feb 16, 2010 5:57:57 GMT
Now we've entered the 20% part of the 80/20 rule... From across the room we look like we're as good as done, but there has been lots of tuning and tightening relatively minute aspects of the model - both in terms of shapes and accuracy of the subject as well as in how the shapes break down into paper model parts. Redid the inner tub, did some round-trips through Pepakura to fix isolated model faces and odd panel splits, and am starting to build the interior and dashboard details.   Pepkura's output will require a chunk of work to clean up to the ultra-crisp and refined Prototyp model standard. Bit tedious with all the layered 1pt lines and separate outline objects that Pepa likes to place on the shapes. Still, I think better than doing this all by hand with 2d drawings!  Currently doing Illustrator cleanup of select parts in preparation for a test-print and test-build. More on that in the next post... |
|
|
|
Post by prototyp on Feb 23, 2010 6:42:08 GMT
The LMR's CAD modeling and Pepakura part split work have stabilized, so it's time to bash things together and see how the design shakes out. Parts are pulled from Pep's manic eps output files into test-sheets and given a thorough clean-up of linework, fills, tabs, and organized into reasonable arrangement. Little bit of tedium arises from the fact that organizing Meta model elements in layers prevents Pepa from automatically generating tabs for connected parts. Pepakura makes up for this in a way through its 'reload model' workflow. I can build up changes and tweeks very nicely in CAD, reload the model in Pepa, and have a few new bits added to the existing ones; particularly handy for going back adding alignment faces in CAD for construction tabs and cuts. EPS outputs are combed for new parts to add to the working master file. This first build is where all the design's guesses and cleverness done in the abstract (or in a sketchbook) get folded into a tangible three dimensional thing. It's been some time since my last design project, so I'm a little rusty. The build reveals any joinery which is too tedious, tabs or fold lines which might be missing from the parts, or adjustments needed to make fiddly bits fit better. For the LMR, I'm half-committed to a full representation of the LMR's core chassis monocoque; I have always felt the 'curbside' models - mine included - and their closed bodywork missed the point of this exercise entirely. The tradeoff is that more detail, and more parts, adds a fair bit of complexity to the model. I added the LMR's 'outer' tub surfaces just yesterday, so have some work to do on deciding what, and how, to keep in the final model.  |
|
|
|
Post by prototyp on Mar 1, 2010 4:54:32 GMT
Finally got around to working out the front splitter assembly. The splitter is truly the business end of a 220 mph machine and a critical detail on this era of car. Unfortunately it is also charged with the most secrets so there's precious little in the way of reference. Some inference, imagination, and staring at Mulsanne Mike's site images, I've got something I rekon is close enough.  With the final splitter design integrated, the core chassis needed some revisions. I didn't like how last week's alpha-build tub went together. Too many opportunities for things to get out of alignment, too fiddly to build… just didn't seem quite right. Perhaps a bit of rust showing through as a designer and engineer. Many of the segments are re-considered and re-grouped.  Crisp, solid foundation…  Next: the rear boxes, floor panel... and the crowning bodywork test build.  |
|
|
|
Post by 123yokomo on Oct 4, 2010 22:24:14 GMT
great job i want to see more once you are finished will you sell it on your website
|
|
|
|
Post by igoraf on Oct 26, 2012 14:25:09 GMT
Could someone tell me if prototyp.org is still active? There is no model available to buy and Ryan doesn't respond emails  ... I'd like to buy some of their models... |
|


 ... I'd like to buy some of their models...